
These stained glass cookies are as pretty as they are delicious! With their colorful candy centers, they’ll be the star of your holiday cookie tray and a fun baking project for everyone.

Stained glass cookies are classic cut-out sugar cookies filled with melted hard candy for a bright, window-like center that looks just like real stained glass.
Made with a simple sugar cookie dough and crushed candies, these cookies are easy to cut, bake, and decorate for holidays, gifts, or fun baking with kids.
Why you’ll love this recipe
- Colorful candy centers that melt into a glass-like window
- Easy cut-out dough that keeps clean shapes
- Perfect for holidays, gifts, or cookie decorating sessions
Ingredients You Need
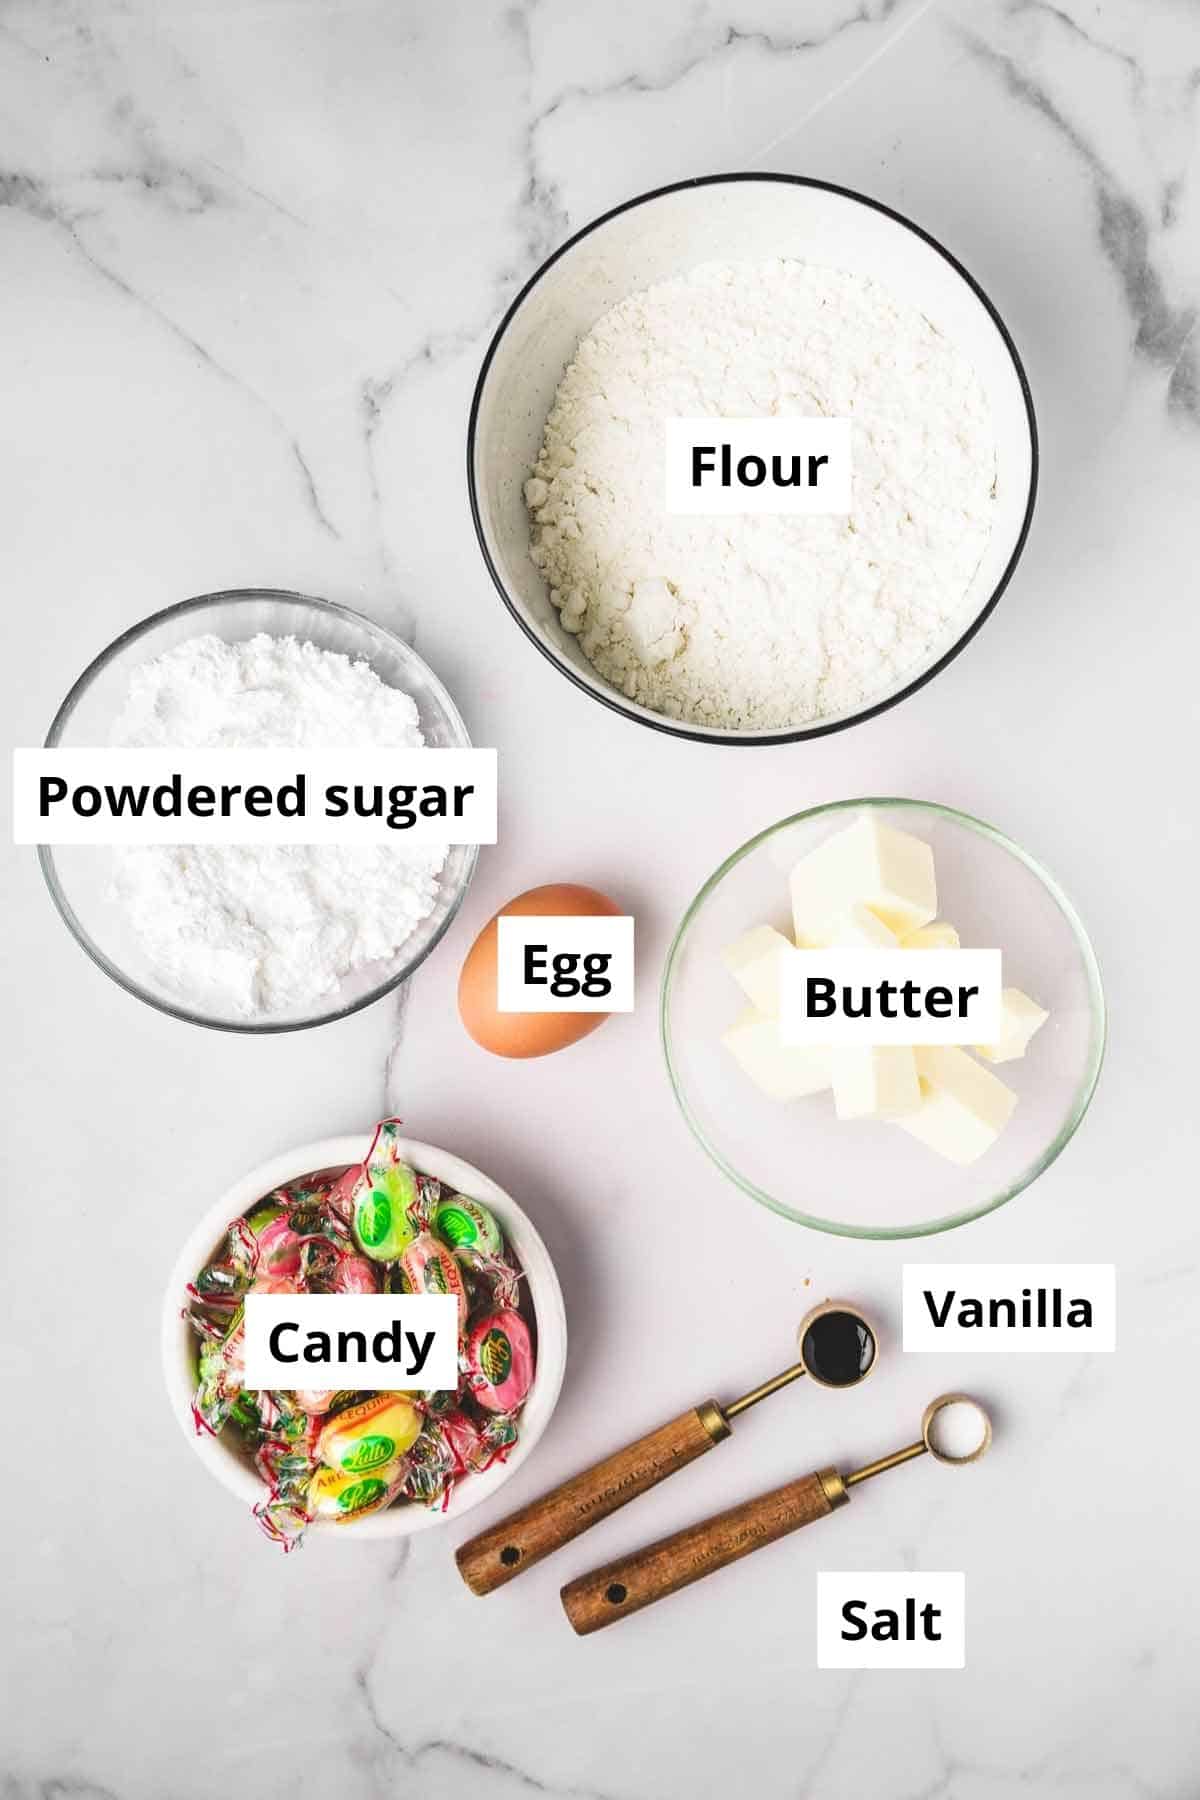
Here’s what you’ll need to make these stained glass window cookies:
- Hard Candy: Choose colorful hard candies (like Jolly Ranchers or Life Savers) that melt beautifully to create the stained glass effect.
- Butter: Use unsalted butter, softened at room temperature, for the best texture and flavor.
- Powdered Sugar: This gives the cookies a smooth, melt-in-your-mouth texture compared to regular sugar.
- Egg: Make sure it’s at room temperature to help everything mix evenly.
- Vanilla and Salt: Vanilla adds warmth and flavor, while salt enhances all the sweet notes.
- All-Purpose Flour: A staple for perfectly tender cookies.
Tips for this recipe
- Chill the dough well: Let the dough rest in the freezer so it’s easy to cut and holds its shape during baking.
- Use translucent candies: Choose colorful, hard, or translucent candies to achieve a beautiful stained glass effect.
- Crush the candies roughly: Avoid turning them into powder, as they might melt too quickly and spill over.
- Watch the baking time: The cookies should be lightly golden around the edges, and the candies fully melted without bubbling.
- Let the cookies cool before moving them: The melted candy centers harden as they cool. Don’t move the cookies from the cookie sheet until they’re completely cooled to avoid breaking the centers.
How To Make Stained Glass Cookies
It’s a flavored variation of my go-to Cut-out sugar cookie recipe, with the same no-spread dough.
In a large bowl with an electric mixer, or in the bowl of a stand mixer fitted with the paddle attachment, cream the softened butter with the powdered sugar until smooth and creamy.
Add the egg and vanilla extract, then mix again until fully incorporated.


Finish by adding the flour and salt, mixing just until a smooth, slightly sticky dough forms. Gather the dough, wrap it in plastic wrap, and place it in the fridge for 20 minutes.


Roll out the cookie dough between two sheets of parchment paper, then place it in the freezer for 15 minutes. Use a large cookie cutter to cut out shapes, then a smaller cookie cutter to create a hole in the center.
Place the hard candies in plastic bag and crush them into small pieces (not too fine) using a rolling pin.


Place the dough shapes on a baking sheet lined with parchment paper and fill the centers with the crushed candy pieces.
Bake the cookies in a preheated oven at 350°F (175°C) for about 10–12 minutes, until the edges are golden and the candies have melted in the center.
Let them cool completely before moving or enjoying them!


Storage instructions
- At room temperature: Store the stained glass cookies in an airtight container, away from humidity, for 5 to 7 days.
- Freezing: You can freeze the raw cookie dough for up to 3 months. Thaw it in the refrigerator before rolling it out and cutting the shapes.
Variations
- Different candies: Use hard candies in different colors to change the stained glass effect
- Holiday shapes: Cut the cookies into stars, hearts, or snowflakes
- Chocolate dough: Replace part of the flour with cocoa powder for a chocolate base
- Citrus flavor: Add lemon or orange zest to the dough
- Window cookies: Use smaller cut-outs for thinner candy centers

More Cut Out Cookie Recipes
I hope you’ll love this recipe! If you try this recipe, feel free to leave a comment. It always helps. Happy baking!
Print
Stained Glass Cookies
- Total Time: 30 minutes
- Yield: 20 biscuits
Description
These stained glass cookies are as beautiful as they are delicious! Their colorful, translucent centers make them little treasures perfect for the holidays or to delight the kids. (Makes 20–25 cookies)
Ingredients
- 100 g (½ cup) softened unsalted butter
- 80 g (⅔ cup) sifted powdered sugar
- 1 large egg, room temperature
- ½ teaspoon vanilla extract
- 150 g (1 ¼ cups) all-purpose flour
- 1 pinch of salt
- 10 translucent hard candies
Instructions


Notes
Conservation: Store the stained glass cookies in an airtight container, away from humidity, for 5 to 7 days. The cookies can be frozen for up to 3 months.
Tips:
- Too soft dough: If the dough is too sticky, let it rest in the refrigerator for a longer time.
- Perfect candies: Use translucent hard candies for the best stained glass effect. Avoid gummy or jelly candies.
- Spacing: Leave enough space between the cookies to prevent them from sticking together as they melt.
- Even baking: Keep an eye on the baking time so the edges stay golden without burning.
- Use a digital scale: For more accurate measurements, use a digital scale instead of measuring cups.
- Prep Time: 20 minutes
- Cook Time: 10 minutes
- Category: cookies
- Cuisine: American

Leave a Reply