
Hot chocolate cheesecake with a crunchy Oreo crust, a creamy cocoa filling, and a light whipped cream topping — perfect for cozy winter desserts.

Hot chocolate cheesecake is a rich chocolate dessert inspired by classic hot cocoa, made for true chocolate lovers.
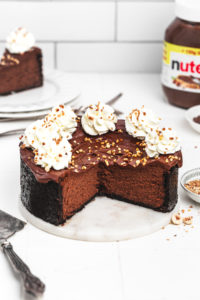
It features an Oreo cookie crust, a creamy cocoa cheesecake filling, and a whipped cream topping with soft marshmallows.
This easy winter dessert is perfect for cozy nights, holidays, or sharing with family and friends.
I created this hot chocolate cheesecake to capture the comforting taste of hot cocoa in a dessert that’s easy to make and perfect for winter.
Why you'll love this recipe
- Ultra creamy texture: smooth, rich chocolate cheesecake with a deep cocoa flavor.
- Hot chocolate vibes: cozy chocolate taste topped with marshmallows for a winter dessert feel.
- Easy crowd-pleaser: simple to make, chocolatey, and always a hit for holidays or gatherings.
Ingredients you need
- Oreo Crust: Made with crushed Oreo cookies and melted unsalted butter.
- Hot Chocolate Cheesecake: Features Philadelphia cream cheese, powdered sugar, hot chocolate powder, unsweetened cocoa powder, eggs, vanilla extract, sour cream, and heavy cream.
- Hot Chocolate Topping: A homemade whipped cream topping made with heavy cream, powdered sugar, and vanilla, finished with marshmallows or mini marshmallows for the perfect cozy touch.

Tips for this recipe
- Use room-temperature ingredients for a smooth, lump-free cheesecake batter.
- Press the Oreo crust firmly so it holds clean slices.
- Tap the pan before baking to release air bubbles and prevent cracks.
- Bake with steam to keep the cheesecake creamy and evenly set.
- Cool gradually in the oven, then chill fully for the best texture.
How to make hot chocolate cheesecake
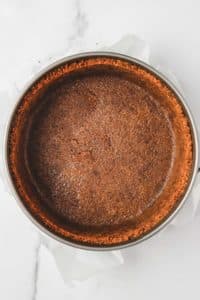
Crush the Oreos into fine crumbs, then mix with melted butter until evenly combined.
Press the crust firmly into a parchment-lined springform pan, going slightly up the sides.

Beat the cream cheese and sugar until smooth and creamy.
Mix in the hot chocolate mix and cocoa powder until fully incorporated.

Add sour cream, vanilla, and heavy cream, then beat until smooth.

Add the eggs one at a time, mixing just until combined after each addition.

Pour the batter over the crust and tap the pan to release air bubbles.

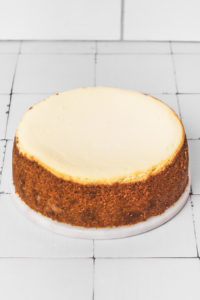
Bake at 300°F / 150°C in a steam bath for 60–75 minutes, until set on the edges and slightly jiggly in the center. Cool in the oven with the door slightly open for 1 hour.
Cover and chill overnight in the refrigerator.
Remove from the pan and decorate with whipped cream, marshmallows, and cocoa powder before serving.

Serving suggestions
- Pair with a mug of hot chocolate or coffee for a cozy dessert moment.
- Serve chilled with a generous swirl of whipped cream.
- Top with mini marshmallows or toasted marshmallows for a hot cocoa vibe.
- Finish with a light dusting of cocoa powder or chocolate shavings.
Storage
- Fridge: Store the cheesecake (without topping) covered for up to 3–4 days. Add toppings just before serving.
- Freezer: Freeze without topping for up to 1 month, well wrapped.
- Thaw: Thaw overnight in the fridge before decorating and serving.
Recipe Variations
- Marshmallow swirl cheesecake: Swirl mini marshmallows into the batter before baking.
- Dark chocolate hot cocoa cheesecake: Use dark cocoa powder for a deeper chocolate flavor.
- Peppermint hot chocolate cheesecake: Add a few drops of peppermint extract to the filling.
- Nutella hot chocolate cheesecake: Swirl Nutella into the cheesecake batter for extra richness.
- Mini hot chocolate cheesecakes: Bake the recipe in a muffin pan for individual servings.
Recipe Questions
Can I use hot chocolate mix instead of cocoa powder?
Yes, this recipe uses hot chocolate mix for flavor, paired with unsweetened cocoa powder to balance sweetness.
How do I know when the cheesecake is done?
The edges should be set while the center stays slightly jiggly when you gently shake the pan.
Can I make this hot chocolate cheesecake ahead of time?
Yes, it’s best made the day before and chilled overnight for the perfect texture.
How do I prevent cracks on the cheesecake?
Bake at low temperature with steam and let it cool slowly in the oven before refrigerating.
Can this cheesecake be frozen?
Yes, freeze it without toppings, well wrapped, for up to one month.

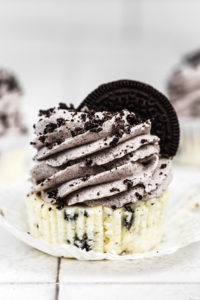
More cheesecake recipes
I hope you’ll love this recipe! Rate it ★★★★★ and leave a quick comment — it always helps. Happy baking!
Print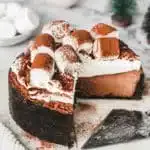
Hot Chocolate Cheesecake
- Total Time: 1 hour 30 minutes
- Yield: 10 slices
Description
Hot Chocolate Cheesecake with an Oreo cookie crust, a sweet cocoa cheesecake filling, and a whipped cream and marshmallow topping (for an 8-inch pan, serves 8-10).
Ingredients
Oreo Crust
- 30 Oreo cookies
- 60 g (4 tbsp) unsalted butter, melted
Cocoa Cheesecake
- 680 g (24 oz) cream cheese - Philadelphia
- 140 g (⅔ cup) granulated sugar
- 60 g (½ cup) sweetened cocoa powder
- 35 g (⅓ cup) unsweetened cocoa powder
- 120 g (½ cup) heavy sour cream
- 50 ml (¼ cup) heavy cream -full fat
- 2 tsp vanilla extract
- 4 large eggs, room temperature
Topping
- 250 ml (1 cup) cold heavy cream
- 1-2 tablespoon powdered sugar
- 1 tsp vanilla extract
Instructions
Chocolate cheesecake
- Crush the Oreos in a food processor until they turn into fine crumbs. Add the melted butter and process again until the mixture is well combined and resembles wet sand.
- Press the Oreo mixture into the bottom and slightly up the sides of a 20 cm (8-inch) springform pan lined with parchment paper.
- Use the bottom of a glass to pack it tightly. Place the pan in the refrigerator to firm up while you prepare the cheesecake filling.
- Preheat your oven to 150°C (300°F) and boil a medium pot of water for the water bath.
- In a large mixing bowl, beat the cream cheese on medium-low speed with an electric mixer until smooth and creamy.
- Gradually add the sugar and beat until fully incorporated.
- Sift the sweetened and unsweetened cocoa powders into the mixture and beat until combined.
- Add the sour cream, heavy cream, and vanilla extract, and mix until just combined.
- Beat in the eggs one at a time on low speed, mixing just until incorporated to avoid over-aerating the batter.
- Pour the chocolate cheesecake mixture over the chilled Oreo crust and smooth the top with a spatula.
- Pour the boiling water into the bottom of a roasting pan or baking dish placed on the oven rack below the cheesecake.
- Place the springform pan on the rack above and bake for 60–75 minutes, or until the edges are set but the center still jiggles slightly.
- Turn off the oven, crack the door open, and let the cheesecake cool inside for 1 hour.
- Cover the cheesecake with aluminum foil and refrigerate for at least 6 hours or overnight for best results. Run a knife around the edges before releasing the springform pan.
- Transfer the cheesecake to a serving plate.
Whipped cream topping
- Beat the cold heavy cream with powdered sugar and vanilla extract on medium speed for 2–3 minutes, or until stiff peaks form.
- Spread the whipped cream over the cheesecake.
- Garnish with marshmallows or mini marshmallows, dust with cocoa powder, or sprinkle chocolate shavings on top.
- Slice and enjoy your cozy, indulgent hot chocolate cheesecake!


Notes
Storage: Keep the cheesecake refrigerated for 3–4 days or freeze it for up to 1 month.
Tips:
- Bring all ingredients to room temperature before starting to ensure a smooth and creamy texture.
- Use a digital kitchen scale to measure ingredients for the best accuracy and results, instead of relying on measuring cups.
- Press the Oreo crust firmly to make it compact and prevent crumbling.
- Bake the cheesecake in a water bath to avoid cracks.
- Let the cheesecake cool completely before adding the topping so it stays in place.
- Whip the cream and add the marshmallows just before serving for the best presentation.
- Prep Time: 20 minutes
- Cook Time: 70 minutes
- Category: cheesecake
- Cuisine: American
Nutrition
- Serving Size: 1 slice
- Calories:
- Sugar:
- Sodium:
- Fat:
- Saturated Fat:
- Trans Fat:
- Carbohydrates:
- Fiber:
- Protein:
- Cholesterol:
Susan D
I made this yesterday for my daughter's 21st birthday. The whole family loved it. So easy to make and delicious! I left of the topping and it was perfect. Thank you!